

A sitting fox with carved, feather-like fur ended up as the main test subject for this guide. It started as a free community model on Meshy's game development page, got opened in the workspace, was regenerated from its own reference image, and then had its ears reshaped using a brush selection and one line of text. A few hours of hands-on use made one thing clear: the editing loop is the headline feature, not the download button, and that single capability is what separates the tool from most AI 3D generators a solo developer can try without a credit card.
Below is what the free library actually contains, how Unity, Unreal, Godot and Roblox each handle FBX, GLB and OBJ files, and the full step-by-step test with screenshots.
| Download formats FBX, GLB, OBJ | PBR maps 4 per model | Free credits 100 per month | Engine plugins 4 game engines |
What Meshy's free game assets actually are
The free assets live in a community section on Meshy's Game Development page, under the heading "Download Free Game Assets, Straight from the Community." Every model there was generated by a Meshy user and published to the gallery. The page states they are free in FBX, OBJ and GLB, and the full download menu also lists BLEND, USDZ, STL and 3MF, which covers almost every pipeline a game developer is likely to run.
| CharactersTagged as rig-ready humanoids in FBX and GLB, marked Unity and Unreal ready. | WeaponsSwords, staffs and shields with PBR textures baked in on export. |
| PropsCrates, lanterns, potions and small set dressing pieces. | EnvironmentsTrees, rocks, ruins and modular building pieces. |
Each card shows a view count, the creator's username, a download icon and an "Open in Workspace" button. The workspace option matters more than it looks, because it lets a community model become the starting point for a new version instead of a fixed file. That turns the free library into something closer to a working asset pipeline than a static download page.
Every model ships with four PBR texture maps: base color, normal, metallic and roughness. Those four maps plug into the standard lit material in all four engines covered here, so no UV unwrapping or manual shader setup is needed.
Free to browse is not the same as free to export. Meshy's plan comparison, checked in November 2026, caps Free accounts at 10 downloads per month of Meshy 6 Lite models. The row for community model downloads shows "Unlimited" on Pro and above, with no allowance listed for Free. For browsing and experimentation the Free tier does its job; for production work, Pro removes the ceiling and unlocks the one-click engine bridges.
Free plan vs Pro: what each tier allows
| Feature | Free | Pro |
| Monthly credits | 100 | 1,000 |
| Assets per month | Up to 10 | Up to 100 |
| Model downloads | 10 Meshy 6 Lite per month | Unlimited |
| Community model downloads | Not listed | Unlimited |
| License on generations | CC BY 4.0, credit Meshy | Private, customer owned |
| Remesh | No | Yes |
| Multi-view image to 3D | No | Yes |
| Animation library | 20 presets | Over 500 |
| Engine plugins and DCC Bridge | No | Yes |
| Price | $0 | $20 per month |
Monthly credits reset on the 1st of each month at 00:00 UTC and do not roll over. New users get 50% off the first month on any monthly plan, which brings Pro down to $10 for the first month during testing. That is unusually low for a tool that otherwise sits near the top of the AI 3D category on G2 and Trustpilot.
FBX, GLB or OBJ: which file to download
| GLBOne self-contained file with PBR textures embedded. Meshy's own docs recommend it for static props and environment pieces. | FBXKeeps the skeleton and animation clips inside the file. The right pick for any character that needs to move. | OBJGeometry with a separate MTL file and textures. No rig, no animation. Best kept for simple background props. |
Engine-by-engine import guide
| Engine | Best format | Native import | Meshy plugin |
| Unity | GLB static, FBX animated | FBX and OBJ import directly. GLB needs the glTFast package. | Unity package, tested on Unity 6 (6000.0.45f1) |
| Unreal | GLB static, FBX animated | GLB and FBX both import in UE5 | Windows builds for UE 5.4 to 5.7 |
| Godot | GLB | glTF is native. FBX is native from Godot 4.3 through ufbx. | Addon dropped into the addons folder |
| Roblox | GLB or FBX | 3D Importer takes FBX, OBJ and glTF/GLB, capped near 20,000 triangles per MeshPart | Browser bridge, static models only, under 20 MB |
All four plugins are free to download, but each one runs through Meshy's DCC Bridge, which needs a Pro account. For most solo developers, this is the single biggest reason to consider the paid tier: it turns a three-minute export-import-fix-materials loop into one click.
Unity
| Step | Action |
| 1 | For GLB files, open Window, then Package Manager, choose Install package by name, and enter com.unity.cloud.gltfast. |
| 2 | Drag the FBX or GLB file into a folder inside Assets. |
| 3 | For FBX, check the Scale Factor and the Materials tab in the Inspector. If maps are not assigned automatically, create a URP or HDRP Lit material and connect base color, normal, metallic and roughness. |
Unreal Engine
| Step | Action |
| 1 | In the Content Browser, click Import and pick the file. |
| 2 | Bring props in as Static Meshes. Bring rigged FBX characters in as Skeletal Meshes so the bones and clips survive. |
| 3 | Open the generated material and confirm all four texture slots are filled before placing the asset in a level. |
Godot
| Step | Action |
| 1 | Drop the GLB into the FileSystem dock. Godot converts it into an imported scene automatically. |
| 2 | Double-click the file to open Advanced Import Settings for materials, collision and animation options. |
| 3 | If the plugin is used later, set a main scene first. Meshy lists a missing main scene as the most common cause of import errors. |
Roblox Studio
| Step | Action |
| 1 | Reduce the mesh below roughly 20,000 triangles per part before importing. Roblox treats this as a hard rendering limit. |
| 2 | Open the 3D Importer, select the FBX, GLB or OBJ, review the preview window, then import it as a MeshPart. |
| 3 | For full PBR shading, add a SurfaceAppearance object to the MeshPart and assign the texture maps. |
Hands-on testing: editing and remixing a free model step by step
The test used Meshy's web workspace on a Free account that started the session with 95 credits. The goal was to take a published community model, rebuild it, and change one part of it with Edit Mode.
Step 1
Starting on the Game Development page
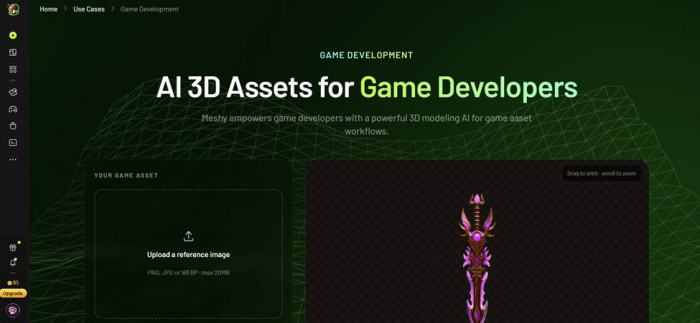
The page opens with an "AI 3D Assets for Game Developers" panel. A reference image can be uploaded in PNG, JPG or WEBP format up to 20 MB, or a text description can be typed instead. A sample fantasy sword sits in a live preview that can be orbited by dragging and zoomed by scrolling, which is a friendlier first impression than the blank text box most AI tools open with.
Step 2
Browsing the community library
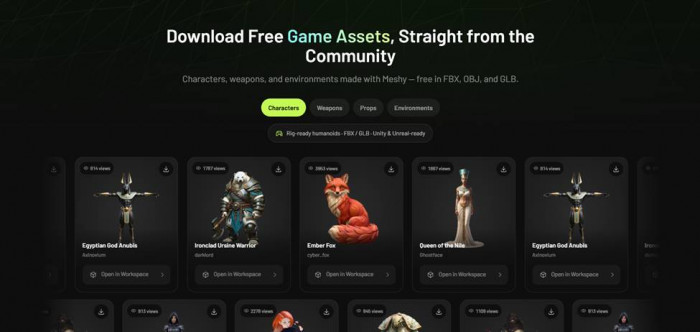
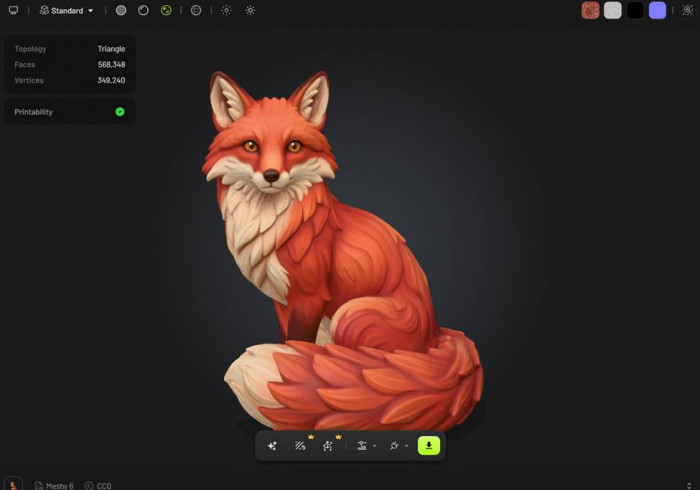
Under the Characters tab, the label reads "Rig-ready humanoids · FBX / GLB · Unity and Unreal-ready." Cards visible during testing included Egyptian God Anubis by Axinovium (814 views), Ironclad Ursine Warrior by darklord (1,787 views), Ember Fox by cyber_fox (3,953 views) and Queen of the Nile by Ghostface (1,867 views). Ember Fox was chosen because quadruped animals are a common indie need and its detailed fur makes edits easy to spot.
Step 3
Inspecting the Ember Fox
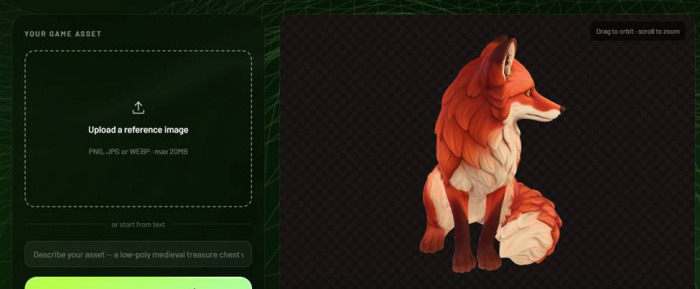
The viewer showed Meshy 6 as the generating model and a CC0 license badge, which means this specific asset carries no attribution requirement. The stats panel reported triangle topology with 568,348 faces and 349,240 vertices, plus a green printability check. Four texture swatches in the top corner confirmed the PBR set.
Step 4
Remixing with Image to 3D
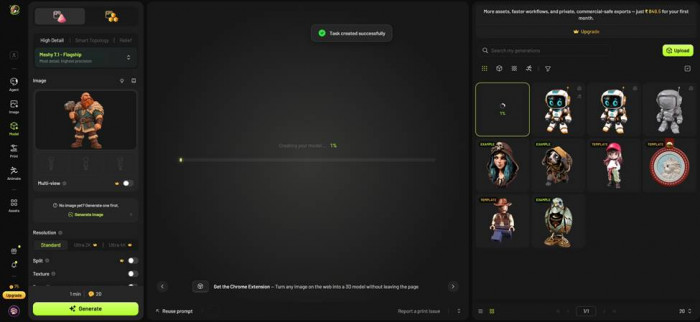
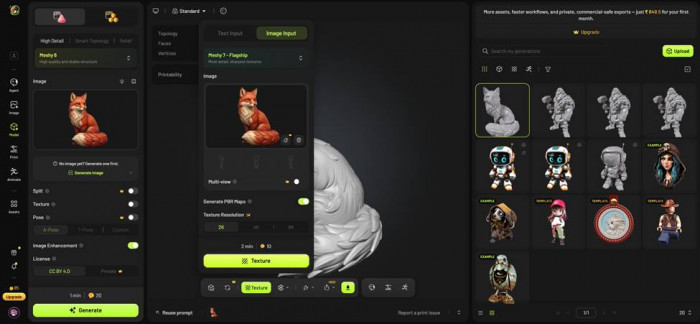
Opening the model in the workspace loaded the fox render as the input image. The settings looked like this:
| Setting | Value during the test |
| Generation mode | High Detail (Smart Topology and Relief also offered) |
| Model | Meshy 6, "High quality and stable structure" |
| Split and Pose | Locked on Free (A-Pose, T-Pose and Custom visible) |
| Image Enhancement | On |
| License | CC BY 4.0 (Private is paid) |
| Cost and time | 20 credits, about 1 minute |
After generating, the balance dropped from 95 to 75 credits, matching the 20-credit price shown on the button.
Step 5
Checking the texture options
The texture panel offered Text Input or Image Input, with Meshy 7 labelled as the flagship model for the sharpest textures. Generate PBR Maps was switched on by default. Texture resolution was set to 2K, while 4K and 8K carried a paid badge, as did Multi-view. A texture pass costs 10 credits and takes about 2 minutes.
Step 6
Looking at the animation panel
The Animate tab prompts for rigging first, then offers Text to Motion, Video to Motion and a preset list including Agree Gesture, Alert, Arise, Attack, Boxing and Casual Walk. The regenerated, untextured fox reported 645,770 faces and 322,877 vertices, slightly heavier than the original.
Step 7
Opening Edit Mode
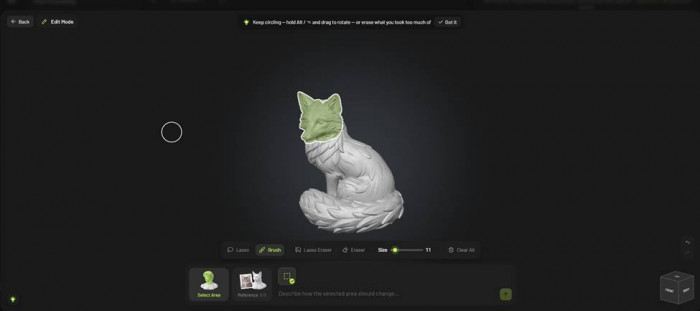
Edit Mode provides four selection tools: Lasso, Brush, Lasso Eraser and Eraser, with a size slider that defaulted to 11 and a Clear All button. Up to five reference images can be attached alongside a text instruction. An on-screen tip advises circling the target area generously and holding Alt or Option while dragging to rotate the model, which is a nicer workflow than popping out to a separate editing screen.
Step 8
Selecting the head with the brush
The brush painted the head and both ears in green. Coverage stayed clean along the neck ruff, with no bleed into the chest fur, which is the moment the tool started to feel genuinely useful rather than novel.
Step 9
Testing the lasso on the tail
To compare tools, a lasso loop was drawn around the curled tail with the instruction "make his ears big." The lasso handled the large curved shape in a single loop, which is faster than brushing for big regions. The final model below still carries its tail, as this run focused on the ear edit.
Step 10
The result: a fox with bigger ears
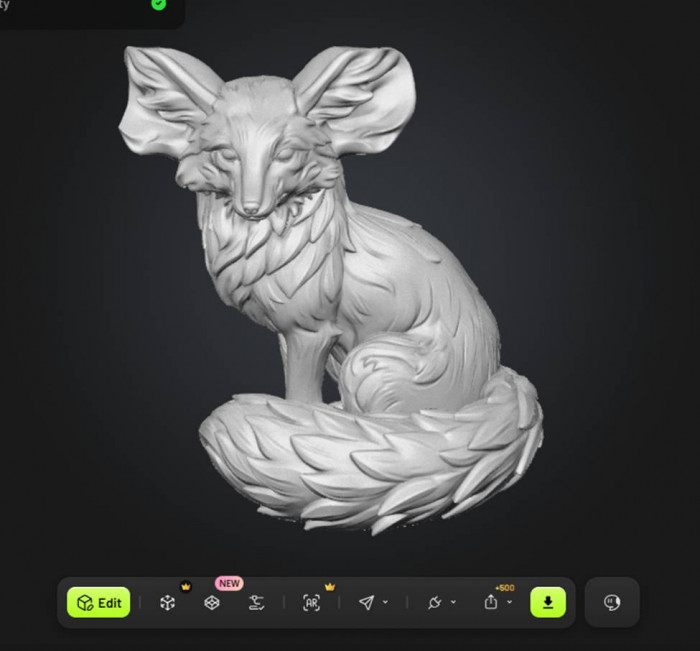
With the head selected, a prompt asking for bigger ears returned a model whose ears were dramatically larger and flared outward, giving it a fennec-like silhouette. The carved fur pattern continued onto the new ears instead of turning smooth, and the chest ruff, body and curled tail outside the selection stayed close to the original. The output came back untextured, so a texture pass is still needed before export.
What the test recorded
| Measure | Result |
| Original Ember Fox | 568,348 faces, 349,240 vertices |
| Remixed fox | 645,770 faces, 322,877 vertices |
| Image to 3D cost | 20 credits, about 1 minute |
| Texture pass cost | 10 credits, about 2 minutes |
| Credit balance | 95 before, 75 after generation |
The polycount problem. Meshy's own guidance suggests about 50,000 triangles for hero characters, 10,000 for NPCs and 3,000 for props. The tested fox was more than ten times the hero budget and nearly 30 times the Roblox cap. The built-in Remesh tool is designed for exactly this, which is another reason the paid tier is a practical purchase for anyone shipping on mobile or Roblox. Free users will need Blender's Decimate modifier instead.
Pros and cons
| Strengths | Considerations |
| Library sorted by game asset type, with creator credits and view counts | Free plan export limits are tight |
| Full four-map PBR set on every model | Default meshes are far too dense for Roblox and mobile |
| Region editing with brush, lasso and a plain-text instruction that keeps unselected geometry intact | Remesh, multi-view, 4K textures and plugins require Pro |
| Image to 3D results in roughly a minute | Licenses vary by asset: CC0 on the tested fox, CC BY 4.0 on new Free generations |
| Official plugins for Unity, Unreal, Godot and Roblox | Unity needs an extra package for GLB |
Who this suits
| Indie prototypersFast placeholder characters and props for greyboxing a level, with enough polish to stand in for weeks. | Roblox creatorsWorkable after reducing triangles, with GLB going straight into the importer and a direct Creator Hub bridge on Pro. |
| Devlog and short-form creatorsQuick 3D subjects for Reels, Shorts and thumbnails, generated faster than most creators can storyboard. | Less suited forTeams that need hand-optimized hero assets with clean quad topology for AAA pipelines. |
Final verdict
After a full session moving between the community library of free game assets, the workspace and Edit Mode, the strongest part of Meshy’s free offering turned out to be the editing loop rather than the download button. Painting over a fox’s head, typing one instruction and getting back a model with much larger ears, while the chest fur and tail stayed put, is an iteration that would take a 3D artist far longer by hand. For creators working alone or on a dev-log, that single capability is worth the sign-up on its own, and the fact that it works on a $0 account is unusual for a tool at this quality level.
The weak spot is the last mile into an engine. Every model checked during testing sat above 500,000 faces, the Free plan restricts exports, and the one-click plugins all require Pro. For prototyping and experimentation, the free tier is genuinely useful and currently among the more polished AI 3D workflows a game developer can try without a card. For a shipped Roblox experience or a mobile game, Pro at $20 per month, with Remesh and the DCC Bridge included, is the realistic recommendation. Check each asset's license badge before it goes anywhere near a commercial build, and the same session that started with a published fox can end with a game-ready character sitting in a Unity scene.
Comments