
SeaArt AI looked simple from the outside, but after using it, I quickly realized it is not just another prompt-to-image website. It is closer to a browser-based AI art workspace where you can create anime characters, realistic portraits, image remixes, short videos, LoRA-based visuals, and advanced ComfyUI workflows without installing Stable Diffusion locally.
That flexibility is the main reason SeaArt AI is interesting. It gives users a lot of creative control, but it also asks for patience. Some features are easy to use from the first try, while others only start making sense after testing different models, settings, prompts, and credit usage.
Quick Verdict After Using SeaArt AI
SeaArt AI is best for users who enjoy experimenting with AI visuals. If you want anime art, character designs, fantasy portraits, model-based image generation, and more control than a basic AI image tool, SeaArt AI gives you plenty to work with. The anime results were the strongest part of my testing, while realistic portraits and video generation needed more trial and error.
The platform is not perfect for complete beginners. The dashboard can feel crowded, the credit and stamina system needs explanation, and advanced features like LoRA and ComfyUI are not instantly obvious. But once I understood how the platform works, SeaArt AI felt more powerful than many simple image generators because it lets you control the style, model, references, and output direction more deeply.
| Area | My Experience |
| Best use case | Anime art, character design, fantasy visuals, model-based image creation |
| Strongest feature | Anime generation and model variety |
| Weakest area | Pricing clarity and beginner learning curve |
| Free plan | Available with limited daily stamina |
| Paid plans | Start around $5.99 per month |
| Learning curve | Medium |
| Best for | Creators who like testing prompts, styles, LoRAs, and models |
| Overall rating | 4.1 out of 5 |
What Is SeaArt AI?
SeaArt AI is a generative AI platform for creating images, anime art, realistic portraits, short AI videos, and model-based visuals. It supports text-to-image, image-to-image, AI video tools, upscaling, LoRA models, community models, and ComfyUI workflows. That makes it different from tools that only give you one prompt box and a few style presets.
The easiest way to understand SeaArt AI is this: it gives you a Stable Diffusion-style creative experience inside the browser. You do not need to download models, install a local setup, manage GPU settings, or configure complicated files on your computer. You can open the platform, pick a model, write a prompt, adjust settings, and start generating visuals online.
This is also why SeaArt AI can feel slightly confusing at first. It is not designed only for one-click image creation. It is built for users who want more options, including model choice, prompt control, LoRA styling, image references, video experiments, and workflow customization.
My First Impression of the Dashboard
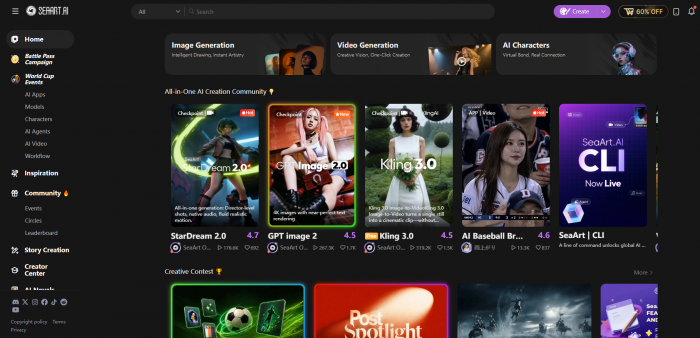
When I first opened SeaArt AI, the dashboard felt busy. There were community creations, image tools, model suggestions, style options, character visuals, and different creation modes placed across the interface. It was not difficult to start, but it was not as clean as Canva or Adobe Express either.
The basic image generator was easy to find. I could choose a model, enter a prompt, select settings, and generate an image without much confusion. The deeper controls appeared when I started looking at model pages, LoRA options, generation settings, and ComfyUI. That is where SeaArt AI started feeling less like a simple AI art website and more like a full creative platform.
My first impression was mixed in a good way. The platform clearly had depth, but it also needed time. A beginner may feel overwhelmed during the first session, especially if they do not already understand terms like LoRA, checkpoint, negative prompt, sampling, image strength, or stamina.
The Community Feed and What It Is Actually Useful For
When I first opened SeaArt AI I mostly scrolled past the community section trying to find the generation tools. That was a mistake I corrected later.
Almost every image in the community feed comes with the prompt, model, and settings that created it. That means you can find an output you like, read exactly what was typed to produce it, and see which model and LoRA were used. For someone still figuring out why their results look different from what they see in screenshots, that information is genuinely useful.
I started treating the feed as a reference library rather than a gallery. When I wanted to understand which model produced a specific anime style, browsing the feed was faster than testing models blindly. It also gave me a realistic sense of SeaArt's actual ceiling early on. Some community outputs are very strong, and seeing them helped me understand the platform could do more than my first attempts suggested. I just needed to work out how to get there.
I Tested the Text-to-Image Generator First
The first feature I tested was text-to-image generation. I started with a simple prompt first, something like:
“A futuristic female warrior standing in a neon city, cinematic lighting, detailed outfit, rain, high detail.”
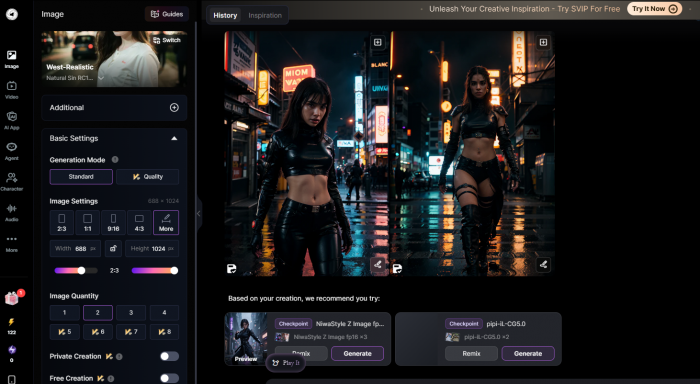
The first result was usable, but not perfect. The colors looked strong, the lighting had a nice cyberpunk feel, and the character design was visually attractive. However, the hands were not completely clean, and a few background details looked slightly messy. This was not surprising because most AI image generators still struggle with fingers, complex poses, and crowded backgrounds.
Then I improved the prompt by adding more details about camera angle, mood, art style, background, and quality. The second and third outputs were noticeably better. The character looked sharper, the outfit had more detail, and the city background felt more intentional instead of random. This told me that SeaArt AI rewards detailed prompting.
What stood out most was model choice. The same prompt gave very different results depending on the model I selected. One model made the image look more anime-inspired, another made it more realistic, and another pushed it toward fantasy concept art. This is where SeaArt AI feels stronger than basic image tools. You are not locked into one default visual style.
How to Write Prompts That Actually Work on SeaArt AI
After testing many generations, I noticed SeaArt AI responds to prompts differently from simpler tools. Short prompts work fine on basic generators. Here they tend to produce average results. The more structured the input, the more targeted the output.
The shift that helped me most was breaking prompts into layers: subject, appearance, setting, lighting, mood, and art style. That structure alone improved my results faster than changing models. I also started using negative prompts seriously. Adding terms like "blurry, bad hands, low quality, extra limbs" to the negative field cleaned up a lot of small issues that were quietly slipping through.
A few habits that made a consistent difference:
● Lead with the most important element. Character first, then setting, then mood.
● Add quality tags near the end. Terms like "high detail, masterpiece, sharp focus" push the output noticeably.
● Match prompt language to the model. Anime models respond better to "soft shading, clean lineart" than photography-style terms.
● Keep it focused. Too many ideas in one prompt usually produces a confused result.
SeaArt AI does not hand you strong results automatically, but once the prompt habit clicks the improvement is obvious.
My Anime Generation Test
Anime generation was easily one of the best parts of SeaArt AI. I tested a prompt for an original anime-style character:
“Anime girl with silver hair, blue eyes, futuristic school uniform, soft lighting, cherry blossom street, detailed background, clean line art.”
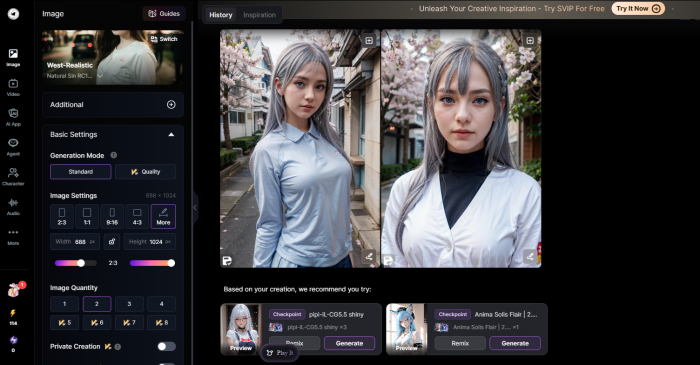
The output looked polished almost immediately. The face was expressive, the colors were clean, and the overall composition looked closer to a finished anime illustration than a rough AI draft. The hair details, eyes, and outfit styling were stronger than what I got from some realistic tests.
I tried another fantasy-style anime prompt with a warrior character, armor, glowing sword, and dramatic sky. This result was also strong. SeaArt handled stylized clothing, dramatic poses, and fantasy lighting better than strict realism. The image had energy and looked usable for character inspiration, avatar creation, or concept art.
The weakness was in small details. Hands still needed checking, accessories sometimes blended into clothing, and background objects could become unclear if the prompt was too crowded. But overall, SeaArt AI felt very comfortable with anime prompts. If I were reviewing it only as an anime art generator, I would rate it higher than its overall score.
Realistic Portraits and Concept Images
After anime generation, I tested realistic portraits. I used a prompt like:
“Realistic portrait of a young fashion model in a studio, softbox lighting, neutral background, natural skin texture, editorial photography.”
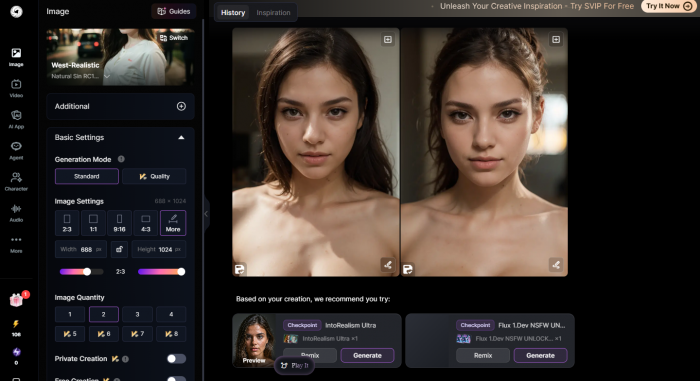
The result was good, but not flawless. The face looked polished, the lighting was clean, and the image had a strong studio-photo feel. However, the skin sometimes looked slightly too smooth, and the expression had that familiar AI-generated quality. It was realistic enough for concept use, but I would not treat every output as professional photography without review.
I tested a second prompt for a realistic fantasy character. That worked better because fantasy allows more visual flexibility. The armor, lighting, and dramatic background helped hide small imperfections that would stand out more in a plain human portrait. SeaArt AI seems stronger when realism is mixed with stylization, such as cinematic portraits, fantasy characters, game concepts, or editorial-style visuals.
My takeaway was simple: SeaArt AI can create realistic images, but it is not always consistent on the first try. You need to test multiple models and generate several variations. For anime and fantasy art, I got usable results faster. For realistic portraits, I had to be more careful.
My Experience With Image-to-Image
Image-to-image was one of the more practical features. Instead of starting from a blank prompt, I used a reference image and asked SeaArt AI to transform it into a different style. This was useful because it gave the output a stronger starting point for pose, framing, or composition.
I tested it with a simple portrait-style reference and tried converting it into an anime-inspired character. The result kept the general face angle and composition, but changed the styling, hair detail, and background. It was not a perfect one-to-one conversion, but it gave me a strong creative version of the original idea.
The best part of image-to-image is control. If you have a rough sketch, pose reference, character outline, or visual moodboard, this feature helps you move faster than text prompts alone. The tricky part is strength control. If the transformation is too strong, the output moves too far away from the original. If it is too weak, the image barely changes. It takes a few attempts to find the right balance.
Testing SeaArt AI’s LoRA and Model Library
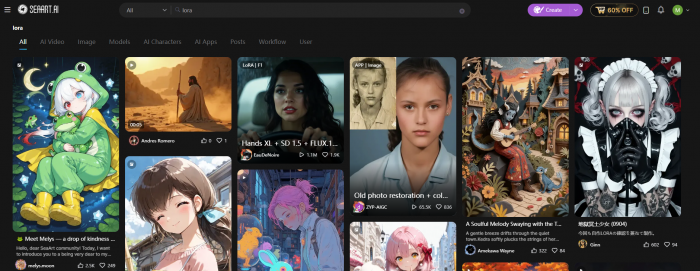
The model and LoRA library is where SeaArt AI becomes more advanced. At first, it felt confusing because there were many models, styles, and community creations to choose from. But after testing a few, I understood why this feature matters.
A model controls the overall image style. A LoRA adds a more specific look, character style, pose style, outfit detail, or visual effect. Once I started combining the right model with a suitable LoRA, the results became more targeted. Instead of hoping the prompt would create the right style, I could guide the output more directly.
For example, when I used a general anime prompt without a specific model, the result was fine but predictable. When I selected a more suitable anime model and added a style-focused LoRA, the output looked more polished and specific. The character design had better consistency, and the final image felt less random.
This is one of SeaArt AI’s biggest strengths. It is not just generating images from prompts. It lets users explore different visual engines and style layers. The downside is that beginners may need time to understand what each model does. If you choose the wrong model, even a good prompt can produce an average result.
Trying ComfyUI Inside SeaArt AI
ComfyUI is not the first feature I would recommend to a beginner. It is a node-based workflow system, which means it gives more control but also looks more technical. If you are only trying to create a quick image, the standard generator is easier.
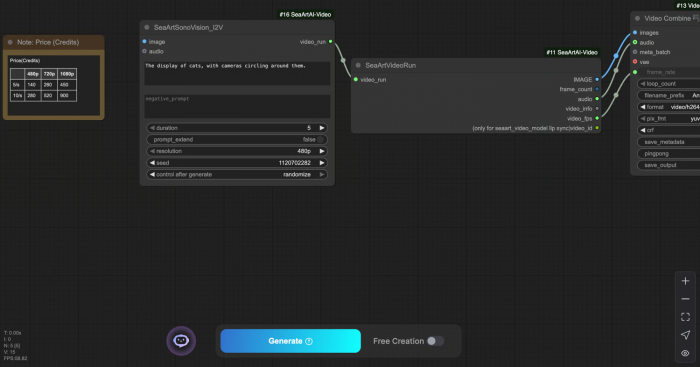
When I opened ComfyUI, the experience felt more advanced immediately. It is built for users who want to control the generation process step by step. This can be useful for image references, upscaling, model workflows, and more complex AI image creation. But it is not something every casual user needs.
My experience with ComfyUI was that it adds serious depth to SeaArt AI, but it also adds friction. I liked that the platform gives advanced users this option without requiring local installation. However, I would not judge SeaArt’s beginner experience based on ComfyUI because it is clearly meant for users who already understand AI generation workflows.
Testing SeaArt AI’s Video Tools
SeaArt AI also includes video-generation features, so I tested them as a bonus rather than the main reason to use the platform. I tried turning a character-style visual into a short motion output. The result was interesting, but not as reliable as still image generation.
The video had movement, but consistency was not perfect. Some details shifted during motion, and the result felt more like a creative experiment than a polished production clip. This is common with many AI video tools, especially when they are part of a larger image platform rather than a dedicated video product.
I would use SeaArt’s video tools for short concept clips, social experiments, motion previews, or creative testing. I would not use it as a replacement for a proper video editor or a dedicated AI video platform. It is a useful extra feature, but image generation is still the stronger reason to use SeaArt AI.
Upscaling and Output Quality
Upscaling helped improve some outputs, especially images that were already strong in composition. When I used it on anime and character visuals, the final result looked sharper and more usable for thumbnails, profile images, or blog visuals. It did not magically fix bad anatomy or poor prompt results, but it improved cleaner images.
This is an important point. SeaArt AI’s output quality depends on the starting image. If the generated image already has weak hands, strange eyes, or awkward composition, upscaling will not fully solve the problem. It works best as a finishing step after you already have a good result.
Overall, the output quality was strongest in anime, fantasy, character design, and stylized portraits. Realistic images were usable but less predictable. Video was fun but experimental. The platform performs best when the user is willing to test prompts, models, and variations instead of expecting a perfect first result.
Output Consistency : What to Expect When You Run the Same Prompt Twice
One thing I specifically wanted to test was how consistent SeaArt AI is across repeated generations. Peak quality matters, but so does reliability.
Running the same prompt twice rarely produces two similar outputs. The character's face, hair, lighting, and background can all shift between generations even when nothing in the prompt has changed. For exploration and moodboarding this is not a problem. The variation sometimes produces something better than what you planned. But for creators who need a consistent character across multiple images it becomes a real limitation. Hair color drifts, facial features shift, and two generations of the same character can easily look like two different people.
The most reliable fix I found was locking in a specific model and LoRA combination rather than relying on the prompt alone. The tighter the style controls, the narrower the output variation. Even then, SeaArt AI works better as a tool you curate results from rather than one that delivers the same output on demand.
SeaArt AI Pricing and Plans
SeaArt AI uses a freemium pricing model based on Credits and Stamina. Stamina works like a daily usage resource, while Credits are used more like a general paid balance. This structure is useful once you understand it, but it can feel confusing at first because the platform does not behave like a simple unlimited monthly subscription.
The free plan is enough to test image generation, explore models, and understand the workflow. But if you generate many variations, use premium models, test video tools, or work with batches, the limits can show up quickly.
| Plan | Monthly Price | Daily Stamina | Best For |
| Free | $0 | Limited daily free stamina | Testing prompts, exploring models, casual image creation |
| Beginner | $5.99/month | 300 daily stamina | Light users who create images occasionally |
| Standard | $29.99/month | 1,800 daily stamina | Regular creators, bloggers, anime artists, social media users |
| Professional | $59.99/month | 4,000 daily stamina | Heavy users, advanced creators, video users, LoRA workflows |
| Master | $149.99/month | 12,000 daily stamina | High-volume creators, studios, agencies, and power users |
The Beginner plan makes sense if you only create a few images regularly. The Standard plan is the most practical option for most creators because it gives more daily stamina without jumping into expensive professional pricing. The Professional and Master plans are better for people who generate heavily, test multiple models daily, or use advanced workflows.
My issue was not only the price. It was the way pricing is explained. Credits, stamina, daily refreshes, model costs, and task limits take time to understand. SeaArt AI gives good value if you use it often, but occasional users should start with the free plan before paying.
What I Liked About SeaArt AI
The best thing about SeaArt AI is how much creative control it gives inside a browser. I liked that I could test different models, change styles, use reference images, explore LoRAs, and generate very different outputs from the same idea. The platform does not force every user into one fixed visual style.
A few things worked especially well:
● Anime and character outputs were often strong from the first few attempts.
● Model selection gave me more control than basic image generators.
● Image-to-image helped when I wanted better composition or pose guidance.
● LoRA support made results feel more specific and less generic.
● Free access made it easy to test the platform before paying.
● ComfyUI support adds value for advanced users who want deeper control.
SeaArt AI is at its best when you treat it like a creative testing space. It rewards users who experiment.
What I Did Not Like
The learning curve is the obvious weakness, but the friction shows up in specific places worth naming.
Model selection is one of the least guided parts of the experience. There are many models in the library but not enough context about what each one actually does well. I wasted stamina early on running prompts through models that were a poor match simply because the names and thumbnails did not tell me enough. Better tagging or use-case guidance would help a lot.
The stamina system also frustrated me more than the limits themselves. Different features burn stamina at different rates and this is not always clear before you run a generation. I finished several sessions with less remaining than I expected because certain tools cost more without obvious upfront indication.
Realistic portrait consistency was more unpredictable than my earlier sections fully captured. The issue is not that realistic images look bad. Sometimes they look genuinely good. The problem is you cannot predict which attempt will land. Skin texture, facial symmetry, and eye quality can vary significantly across generations with the same prompt. For anime that variation feels like part of the process. For realism it feels like a gap.
What Real Users Are Saying
Real user feedback on SeaArt AI is generally positive, but not cleanly one-sided. Many users like the image quality, anime generation, free daily resources, and the large model ecosystem. The platform is especially liked by users who enjoy character creation, fantasy art, and model-based experimentation.
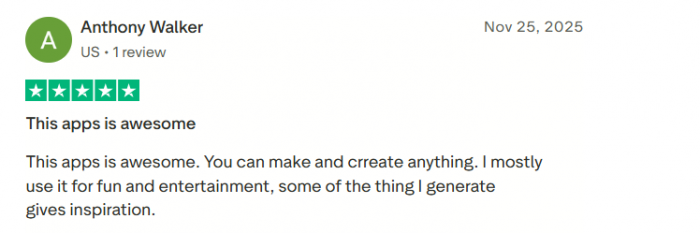
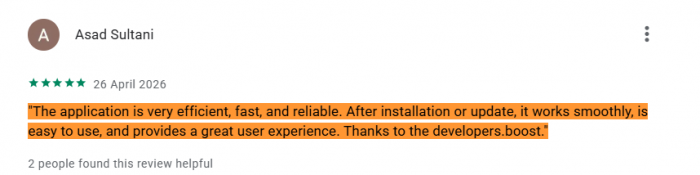
The complaints usually focus on three areas: interface complexity, moderation changes, and billing clarity. Some users say the platform has become stricter over time, while others mention confusion around subscriptions or cancellation. I would not treat every complaint as proof of a serious issue, but I would recommend checking the subscription terms carefully before upgrading.
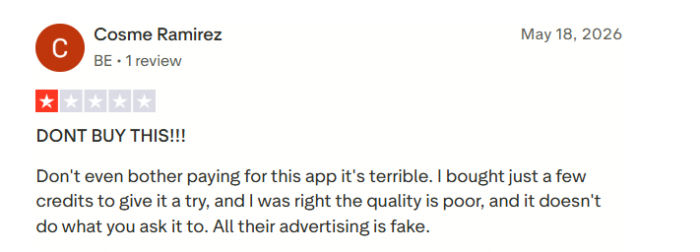

This matches my own experience with the platform. SeaArt AI’s creative tools are strong, but the user experience could be cleaner. The platform gives you a lot, but it does not always explain everything in the simplest way.
SeaArt AI Pros and Cons
| Pros | Cons |
| Strong anime generation capabilities | Busy, cluttered interface that can overwhelm new users |
| Large variety of models (multiple styles available) | Confusing credit/usage structure |
| LoRA support for custom model fine-tuning and style transfer | Inconsistent realism for realistic portraits |
| Browser-based access (no installation required) | Experimental short-video features with hit-or-miss output quality |
| Useful image-to-image tools and remixes | Learning curve for advanced tools and workflows |
| Free testing access / trial options | Not optimized for users wanting ready-made templates, brand kits, or social layouts |
| Advanced ComfyUI options for power users | Less polished for design-focused tasks compared with Canva AI or Adobe Firefly |
Who Should Use and Avoid SeaArt AI?
SeaArt AI is a good fit for anime creators, AI art hobbyists, digital artists, YouTubers, bloggers, social media creators, and game concept designers. It is especially useful for people who want to create character art, fantasy visuals, avatars, thumbnails, moodboards, and stylized images.
It also works well for users who want Stable Diffusion-style control without installing anything locally. If you like choosing models, testing LoRAs, refining prompts, and generating several variations before picking the best one, SeaArt AI will make sense.
SeaArt AI is not ideal for people who want a very simple design tool. If your goal is to create Instagram posts, presentations, brand templates, or marketing graphics quickly, Canva AI or Adobe Firefly may feel more practical.
It is also not the best choice if you expect perfect results from one prompt. SeaArt AI often needs testing. You may need to adjust the prompt, change the model, use a negative prompt, or generate multiple versions before getting the right output.
Best SeaArt AI Alternatives
SeaArt AI is strong for anime art, LoRA models, and browser-based Stable Diffusion-style generation. Still, some tools may suit specific users better.
Midjourney is the better pick when you want polished results without spending time on model selection. It does less but produces strong outputs with far less setup. If hunting for the right model combination on SeaArt starts to feel like work, Midjourney removes that friction.
Leonardo AI covers similar ground with a cleaner interface and a more guided experience for newer users. It handles concept art and game-style visuals well and is easier to navigate when the SeaArt dashboard feels overwhelming.
TensorArt is the closest direct alternative. It runs on community models, supports LoRAs and checkpoints, and offers a similar browser-based Stable Diffusion experience. If you like SeaArt's approach and want a direct comparison, TensorArt is the obvious next test.
PixAI is the stronger dedicated pick for anime. It is more focused than SeaArt and its anime character outputs are very competitive. If anime is the main reason you are on SeaArt, PixAI is worth trying.
Adobe Firefly and Canva AI belong in a different category entirely. They are better for commercial design work, branded content, and social graphics. If your goal is a finished marketing asset rather than character art, those tools get you there faster with less manual effort.
Local Stable Diffusion is the logical next step if you outgrow SeaArt. Everything SeaArt does in the browser, local Stable Diffusion does with more control and no stamina limits. The barrier is setup and hardware, but for serious creators it is worth it eventually.
My Personal Rating
| Category | Rating | Why I Rated It This Way |
| Anime generation | 4.5/5 | Strong character styling, clean colors, and expressive outputs |
| Text-to-image | 4.2/5 | Good results when the model and prompt match well |
| Realistic images | 3.8/5 | Usable, but less consistent than anime and fantasy outputs |
| Image-to-image | 4.1/5 | Helpful for references, pose control, and visual remixes |
| LoRA and models | 4.6/5 | One of the platform’s biggest strengths |
| ComfyUI | 4.0/5 | Powerful for advanced users, but not beginner-friendly |
| AI video tools | 3.5/5 | Fun for experiments, but not the strongest feature |
| Ease of use | 3.5/5 | Simple to start, but crowded once you go deeper |
| Pricing clarity | 3.3/5 | Credits and stamina take time to understand |
| Overall value | 4.1/5 | Strong for creators who want control and variety |
Final Verdict: Is SeaArt AI Worth It?
SeaArt AI is worth using if you want a flexible AI art platform with strong anime generation, model variety, LoRA support, image-to-image tools, ComfyUI, and experimental video features. It is not the simplest AI image generator, but it gives more creative control than many beginner-focused tools.
After testing its main features, I found SeaArt AI strongest for anime, character design, fantasy visuals, and model-based image creation. Realistic portraits were good but needed more attempts. Image-to-image was useful, LoRA support added depth, and ComfyUI made the platform more powerful for advanced users. Video generation was interesting, but still felt like a bonus rather than the main reason to subscribe.
The biggest trade-off is complexity. SeaArt AI gives users many tools, but it also expects them to learn how prompts, models, credits, stamina, LoRAs, and settings work. If you want a simple design app, this may feel too busy. But if you want a browser-based AI art platform with serious creative flexibility, SeaArt AI is one of the better tools to test before moving into local Stable Diffusion.

Charlie Wallerstein
Sep 3, 2026I really like SeaArt’s image-to-image tool because using a reference usually gives me better poses and composition than prompting from scratch. My main issue is that the video results can be inconsistent and the Credits/Stamina system feels more confusing than it needs to be. Still, it’s a fun tool for character art and style experiments.
Login To Reply ↪